POS Market team’s main goal in creating online POS system and offline POS terminal is to support your store’s sales operation. Getting an update of your branch stock or making an inventory spot check will be a breeze. To make this happen, you have to make sure your POS settings is done correctly.
Below is a guide on configuring your offline POS terminal.
**Note: You may refer to the terms in the table below.
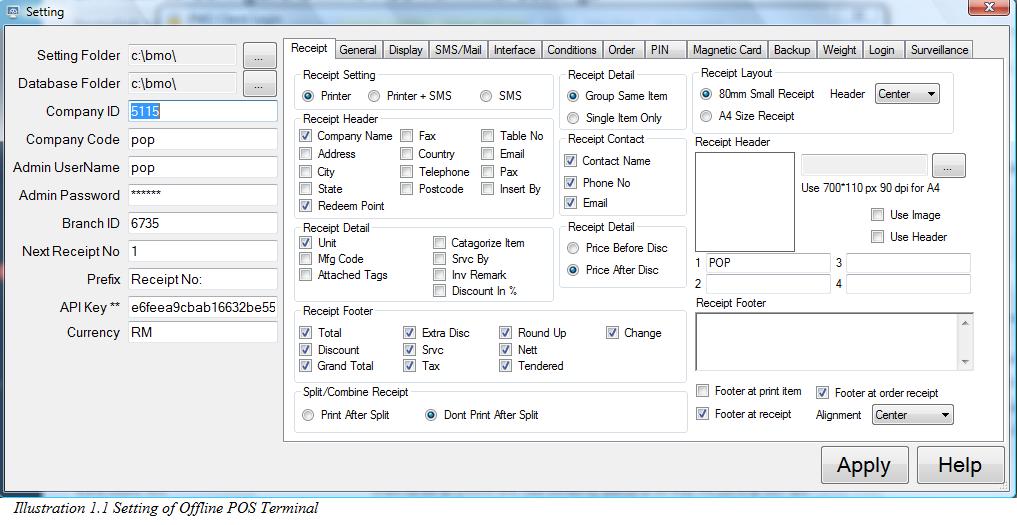
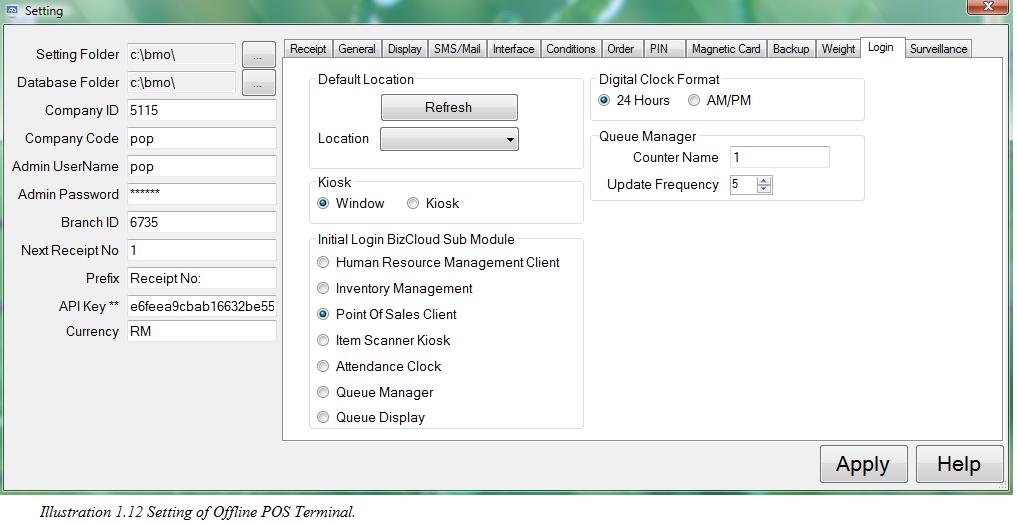
1. You may refer to the screenshot below when you start configuring your offline POS terminal. Some information is vital and it needs to be keyed into the system before we start to use POS Market’s Offline POS System. Click “Apply” after you have finished filling in the settings form.
| Setting | Description |
|---|---|
| Setting folder | Default is C:\BMO |
| Database folder | Default is C:\BMO, for multi-stations, this folder will be the centralized database folder |
| Company ID | The company ID can be found from online BMO system. Login to your own BMO account → Admin → Company ID. |
| Company Code | Company code is the code that user use to login to BMO Offline Pos. (refer to Illustration 7 and 8 below). |
| Admin Username | Key in the initial registered admin username here. |
| Admin Password | Key in the admin password here. |
| Branch ID | The ID for the branch which is currently using this system. Login to your own BMO account → Admin → Branches → Branch List. (refer to Illustration 4 → 6 below). |
| Next Receipt No | The next number on the receipt. |
| Prefix | The prefix of the receipt |
| API Key** | The API key can be found from online BMO system. Login to your own BMO Account → Admin → Company Info (refer to Illustration 7 and 8 below). |
| Currency | Currency for transaction which will be shown in stand display |
| Receipt Tab | |
| Receipt Setting | Define how the receipt send to customers, by printer, SMS or both. If SMS, you will need internet and http://isms.com.my account. |
| Receipt Header | Shows company details such as company name, address, phone number etc in receipt heading. Details should be set at online account. |
| Receipt Detail | Shows details of an item such as unit, manufacturing code etc. |
| Group Same Item | If this option is chosen, when the items are identical, it will be grouped together which add up to the quantity. |
| Single Item Only | Each item will be displayed one line in receipt. |
| Receipt Footer | Shows payment related information such as total, discount, tax, etc. |
| Receipt Contact | Select which customer contact details to be shown |
| Price Before Discount | Show price before discount in receipt |
| Price After Discount | Show price after discount in receipt |
| Split/Combine receipt | Do or don't print after split or combine receipt. |
| Receipt Layout | Choose to print either in 80mm or A4 size receipt. |
| Header | You can adjust the header display to the left, center or right. |
| Receipt Header | Define custom header for the receipt. You can choose a logo or letterhead for your receipt here. |
| Use Image | Tick on it to use the image as receipt header. |
| Use Header | If ticked, the receipt will show this customized header text. |
| Receipt Footer | The text that you want to display on the footer of receipt. Terms can conditions can be inserted here. |
| Footer at print item | You can choose to print the footer together with items as well. |
| Footer at receipt | If you want to show or hide footer at receipt. |
| General Tab | |
| Printer Group | |
| Order Print | When make an order, the system will print the receipt automatically. |
| Receipt with Barcode | Print receipt barcode on the receipt |
| Print item separately | If ticked, system will print out the receipt and items separately in two paper. |
| Print Appended Item | Enable this option will allow the system to print only recently added item in a specific receipt. |
| Item List with Barcode | Attach the barcode of the receipt number when print the item receipt. |
| Font size | Font size for receipt |
| Receipt Printer | Define which printer for receipt printing |
| Item Printer | Define which printer for item printing. It can be separated printer. Sometimes, the printer can be located in the kitchen. |
| 2nd Item Printer | Under some circumstances, you may need extra item printer. |
| Copy | Select the number of copies you want to print for each individual printer |
| Barcode Printer | Define the default barcode printer. POS client is capable of working with most windows based barcode printers. |
| Report Printer | Define the report printer. Normally the report needs A4 printer due to large amount of data. |
| Cut Item Category | If there are needs to separate items according to category and print it in different paper, select this option. |
| Item Font Size | The font size set for item printer. |
| Login Setting Num Pad | Use Num Pad to login to offline POS Terminal |
| None | No other login setting on screen to key in data. Use keyboard to insert data. |
| Virtual Keyboard | Use Virtual Keyboard on screen to login to offline POS terminal |
| Kiosk | Hide other Windows application and only run offline POS Terminal |
| Window | Use all Windows application as usual while offline POS terminal is opened |
| Item Image Synchronization Auto | Auto download picture via online |
| Manual | User downloads picture via online manually |
| None | No downloaded picture |
| Must Enter Table No | Every transaction must key in table number first before making any order. |
| Receipt Print Copy | The number of receipt copies you want to print out for every transaction. "0" means no receipt will be printed. |
| Receipt Footer | Footer show at the end of the receipt |
| Receipt Setting Printer | Print receipt via printer |
| SMS | Print receipt via SMS |
| Printer + SMS | Print receipt via printer and SMS |
| Print Item Separately | Tick if you want to print order receipt (print item only without price) |
| Receipt Printer | Select printer to print receipt |
| Item Printer | Select printer to print order list (item only without price) |
| Dual Screen | Tick to show dual screen |
| Screen Image/Video | Picture and video you need to put on the dual screen. For video, it can only support .wmv format. |
| Enable Stand Display | Tick if you want to enable your stand display |
| Port | The port number for the stand display, eg: COM25 |
| Baud | Baud rate for the stand display. The standard baud rate for stand display is 9600. However if your model is different, please change it and inform us. |
| Character per line | Total number of characters per line in stand display |
| Line 1, Line 2 | The words to be shown on stand display |
| Cash Drawer Trigger Group | |
| Auto Open Cash Drawer | Tick to enable cash drawer open automatically after printing receipt. |
| Enable Cash Drawer Trigger | By default, the cash drawer is connected to the printer. Once the printing job is started, the cash drawer will open (based on printer setting). However, by installing a cash drawer trigger, you can trigger the cash drawer separately. |
| Port | Select the port used by cash drawer trigger. |
| Baud | By default it is 9600, please set it to 9600. |
| Overall Service Charge Control | |
| Srvc Charge Control Online | Control service charge online. |
| Service charge enabled | It enables service charge feature on this POS. |
| Charge Type | It can be percentage or amount, inclusive or exclusive. |
| Charge Amount | Set the value or amount to be charged. |
| Overall Tax (GST) Control | |
| Tax Control Online | Control Tax value online |
| Tax Enable | It enables the tax feature on this POS |
| Tax Type | It can be percentage or amount, inclusive or exclusive |
| Tax Amount | Set the value or amount to be charged. |
| Category Printer Setting | |
| Item Category | select the category that going to apply the cut option |
| Printer | specific whcih printer the selected category's item will be printed at. |
| No of copies | define the number of copy of the item receipt will be printed. |
| Item Image Synchronization | |
| Auto | Automatically sync all images with online account |
| Manual | Manually upload or download an image via inventory window |
| None | Don't sync |
| Display Tab | |
| Dual Screen | To enable dual monitor system. |
| Screen Image/Video | Browse image/video for second screen |
| Enable Stand Display | Enable the pole display which is for customer viewing |
| Port | Choose the correct port |
| Baud | By default, it is 9600, please set it accordingly |
| Characters per line | The numbers of characters per line to be displayed. |
| Line 1 & line 2 | The default welcoming message to show at the stand display. |
| Enable Stand display 2 | Enable it if you need 2 stand display. Normally you will need to use two different drivers and manufacturers for two stand display to prevent driver crashed. |
| Port | Select the correct port |
| Baud | By default, it is 9600, please set it accordingly. |
| Characters per line | The numbers of characters per line to be displayed. |
| Reset Layout | The POS main screen remembers the last location. If you happen to change the monitors, location or etc, please reset the layout to bring back the POS screen. |
| Second screen size group | |
| 1024 * 768 | Your desktop size is 1024 * 768 |
| 1366 * 768 | Your desktop size is 1366 * 768 |
| Max window | Set the default windows size |
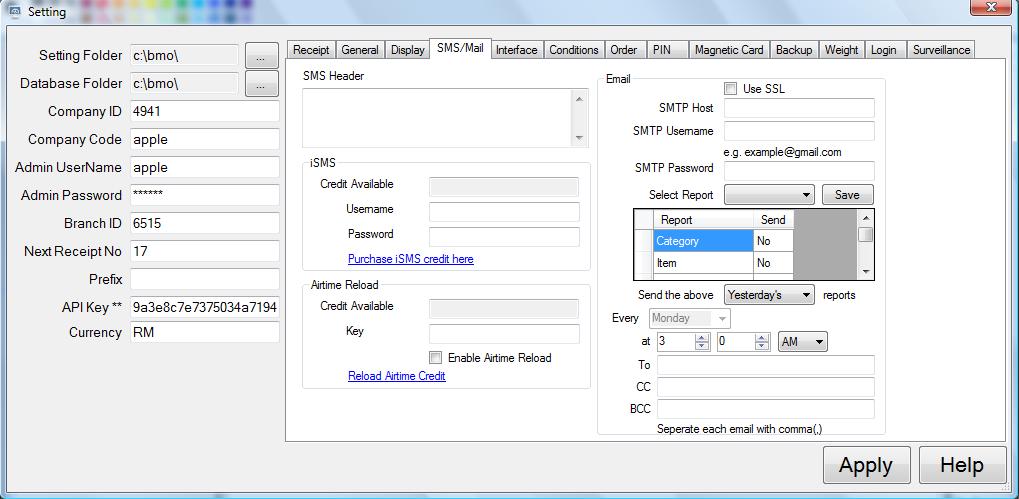
| SMS/Mail tab | |
| SMS Header | Header of your SMS |
| iSMS Group | |
| ISMS Credit Available | Current credits available to send SMS through iSMS |
| Username | Username for login to ISMS account |
| Password | Password for login to ISMS account |
| Airtime Reload Group | |
| Airtime Reload Credit Available | |
| Key | |
| Enable Airtime Reload | |
| Email Group | |
| Use SSL | Determine whether the email will be generated using SSL protocol or not. |
| SMTP Host | SMTP server allows you to access, you have to define which email that The system can accessed to generated email such as gmail ang hotmail. |
| SMTP Username | The email address that will be used to generate report. |
| SMTP Password | The written email address's password. |
| Select Report | Decide which report will be generated to the select email |
| Report Period | Generate the selected report daily (the report on the same day or previous day) or weekly. |
| Date and Time to send the reports | Define when will the reports generated to the entered email address. |
| To, CC or BCC | Specific receiver of the email report. |
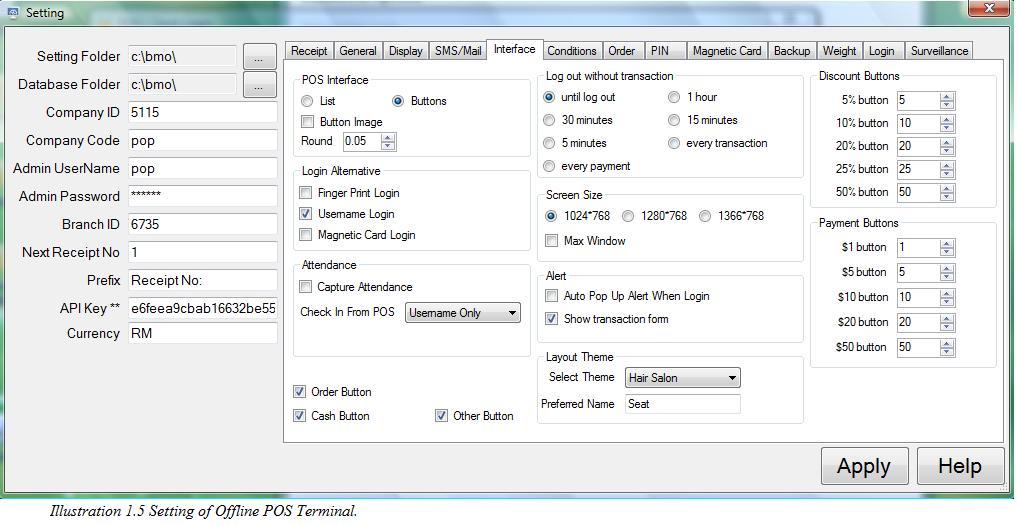
| Interface Tab | |
| POS Interface | |
| List | Shows the item in list form |
| Button | Shows item in button form |
| Button Image | Enable image display inside button. |
| Round | |
| Login Alternative Group | |
| Finger Print Login | Use fingerprint reader to login to system. Please remember to install the URU driver from http://posmarket.com.my |
| Username Login | Use default way to login, based on username and password |
| Magnetic Card Login | Use magnetic card to login. This need card reader |
| Attendance Group | |
| Capture Attendance | To track the employee attendance. The data can be view from human resource management login. |
| Generate Receipt Method | |
| Order Button | To order item before make payment |
| Cash Button | Normal transaction in cash |
| Other Button | To enable or disable the button |
| Log out without transaction Tab | |
| Until log out | System won't log automatically log out until user manually log out |
| 1 hour | Log out every 1 hour without transaction. |
| 30 minutes | Log out every 30 minutes without transaction. |
| 15 minutes | Log out every 15 minutes without transaction. |
| 5 minutes | Log out every 5 minutes without transaction. |
| Every transaction | Log out every transactions. |
| Every Payment | Log out after every payment. |
| Screen Size Tab | |
| 1024 * 768 | For small screen, or typical touch screen size |
| 1366 * 768 | For bigger screen, LCD or laptop |
| Max Window | By default maximize the POS main screen |
| Alert Group | |
| Auto Pop Up Alert When Login | Enable this feature will make the alert message list to pop up first before user get into System. |
| Show transaction form | Enable this checkbox will allow the system to pop up the transaction detail after every POS transaction done. |
| Layout Theme Group | |
| Select Theme | Specific which set of images will be used in layout form when setup the table and counter. |
| Discount Buttons | Define the calculator button that used in discount form. |
| Payment Buttons | Define the calculator button that used in POS payment interface. |
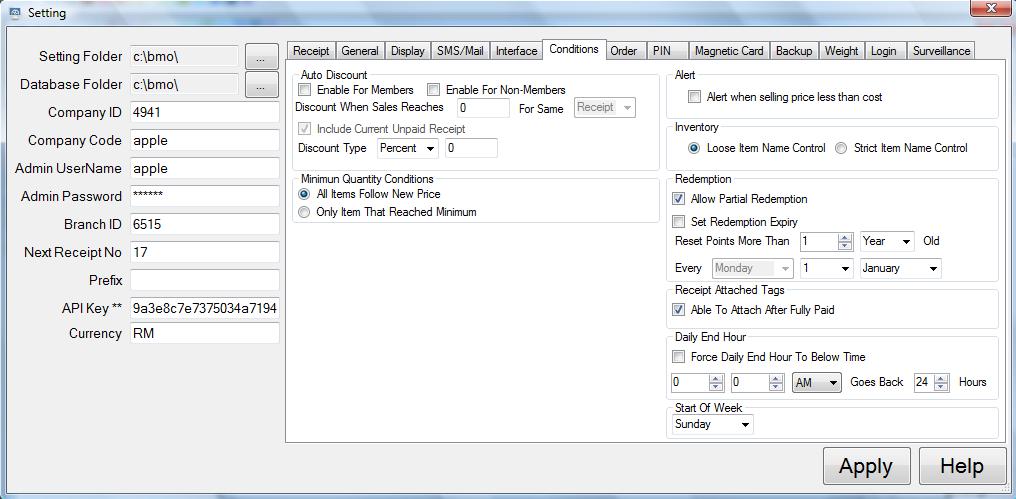
| Conditions Tab | |
| Auto Discount Group | |
| Enable For Members | Enable the auto discount feature for members contact. |
| Enable For Non-Members | Enable the auto discount feature for all non members contact. |
| Amount | The amount of discount that will be given. |
| Discount Type | The type of discount given , either in value or percentage. |
| Minimum Quantity Conditions Group | |
| All Items Follow New Price | Check this to make the selected item to change to new price if the quantity exceed the minimum quantity value set. |
| Only Item That Reached Minimum | Check this to make 1 of item to follow the new price instead of all items when exceed the minimum quantity value. |
| Alert Group | |
| Alert when selling price less than cost | Check this if you want the system to prompt a confirmation message when the price of new item that going to enter to system is less than cost. |
| Inventory Group | |
| Loose Item Name Control | Allow user to change the item name if the item doesn't involved in any transaction. |
| Strict Item Name Control | The item name cannot be changed after the item is created and save into system. |
| Redemption | |
| Allow Partial Redemption | |
| Set Redemption Expiry Period | Enable the redemption value to be resetted after a certain duration. |
| Receipt Attached Tags | |
| Able to Attach After Fully Paid | Allow you to update the attachment of the receipt even after the receipt is fully paid |
| Daily End Hour Group | |
| Force Daily End Hour | reset the daily time end at the defined time. |
| Start Of Week Group | |
| Date | Set the day that serve as start of every week |
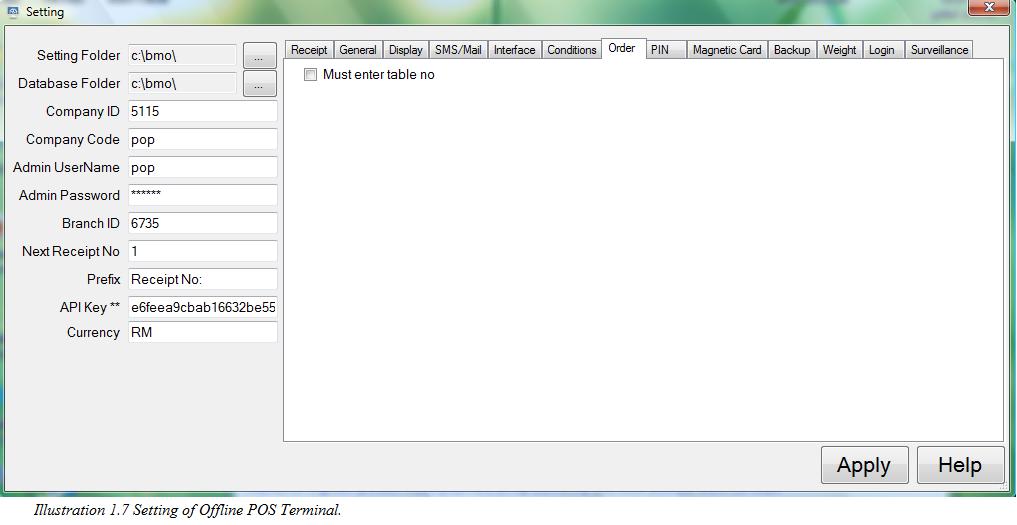
| Order Tab | |
| Must Enter Table No | Force user to enter the table number when making any POS transaction |
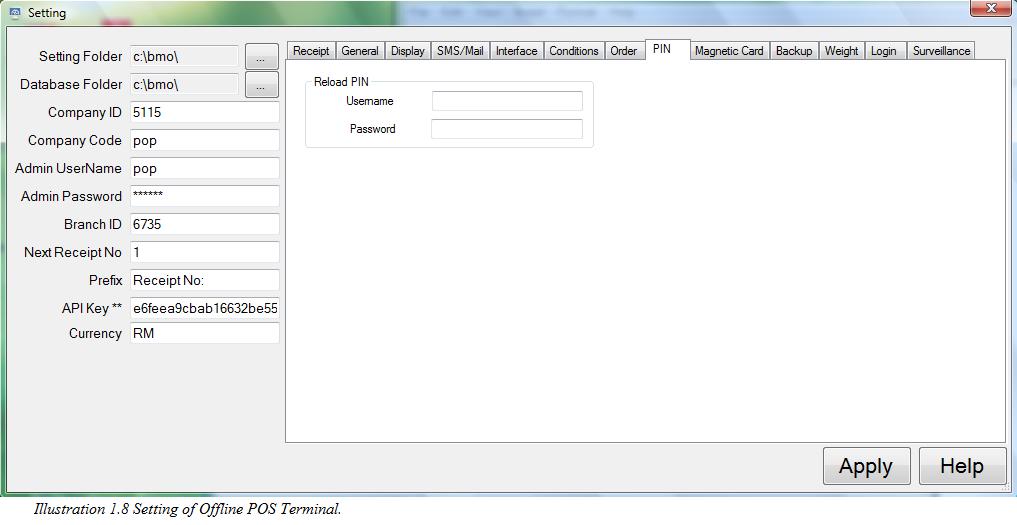
| PIN Tab | |
| Username | Enter the user name to reload the PIN |
| Password | Specific the password for the username entered |
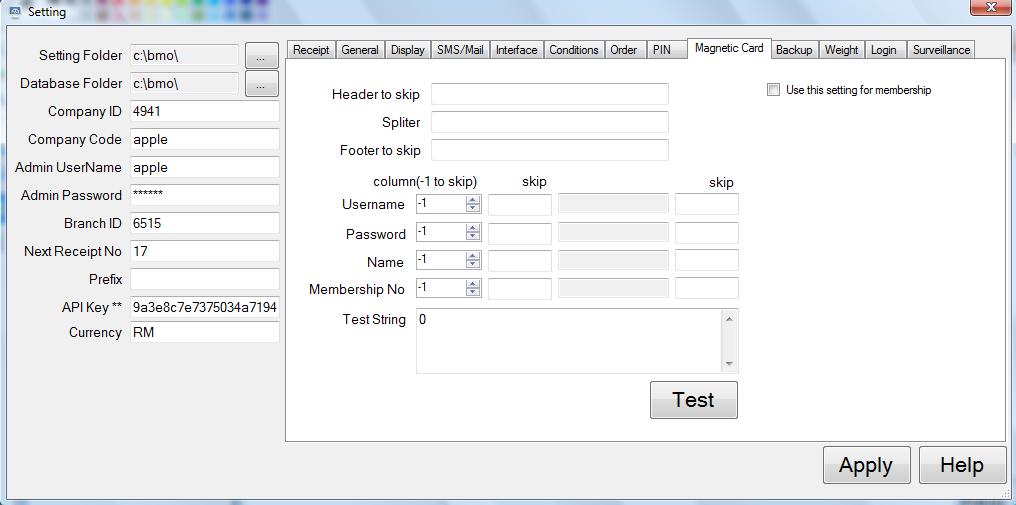
| Magnetic Card Tab | |
| Header to skip | Specific how many character to skipped in a scanned magnetic card |
| Spliter | Define the spliter to seperate the string scanned from card |
| Footer to skip | specific the character to skipped in the end. |
| Column (Username, Password, Name or Membership No) | Example result of username, password, name and membership No after apply the skip setting. |
| Test String | Enter the sample string from scanned magnetic card to test what the result will be display in column |
| Use this for membership setting | Only apply this setting when the customer is with membership status |
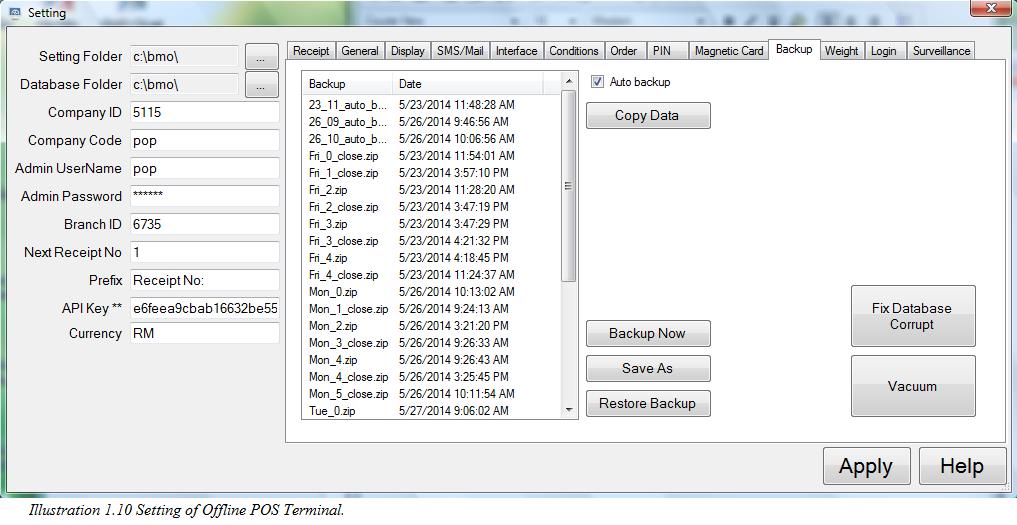
| Backup Tab | |
| Auto backup | Auto backup the database after every login. |
| Copy Data | Copy the database to specific destination. |
| Backup Now | Backup the current database when click on this button |
| Save As | Save the selected backup list to computer. |
| Restore Backup | Restore the system database with the selected based from the list |
| Fix Database Corrupt | Repair the selected database, this function only work when there is dbtools in computer. |
| Vacuum | Reindex the database |
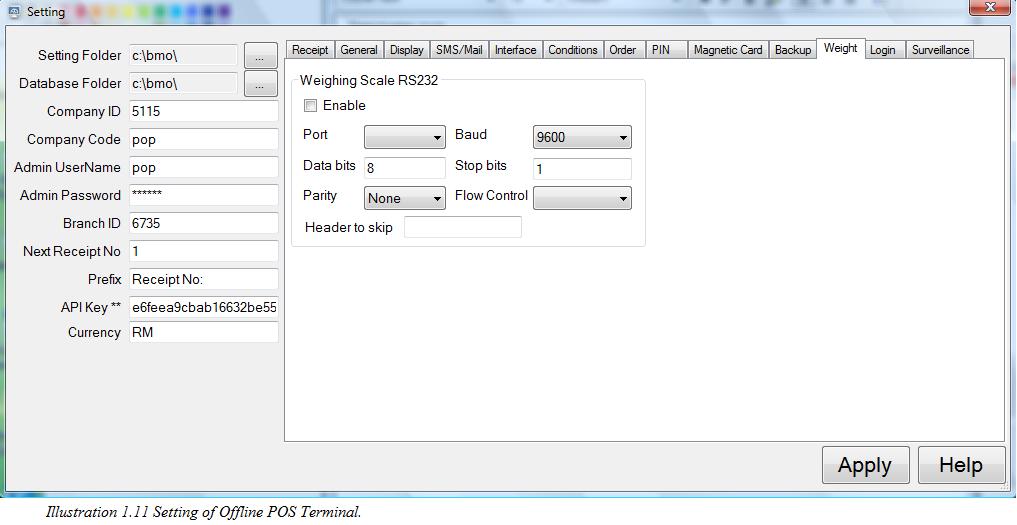
| Weight Tab | |
| Enable | Enable the system to use the connected RS232 weighting machine |
| Port | The port of the weighting machine connected to |
| Baud | By default, it is 9600, please set it accordingly |
| Data bits | Determine data bits value in the connection |
| Stop bits | Define the Stop bit data |
| Parity | Set the parity of RS232 either in odd, even, mark or space |
| Flow Control | Set the flow Control of the RS232 either in Xon/Xof, RTS/CTS or DSR/DTR |
| Header to skip | specific the header information that going to be ignored |
| Login Tab | |
| Location | Set a default location for the POS terminal. |
| Location | Refresh the branch location |
| Window | Display in Windows mode |
| Kiosk | Display in Kiosk mode |
| Human Resource Management Client | The module that focus on manage the employee information and permission |
| Inventory Management | The module that focus on control the inventory storage |
| Point Of Sales Client | Module that allow user to manage all POS transaction and many other feature such as appointment, membership and inventory |
| Item Scanner Kiosk | Used to scanned the item barcode that match to the item in inventory database |
| Attendance Clock | Allow employee to check in / out with this module |
| Queue Manager | This module will display all the receipt made (on the particular day) in a list that can be used to displayed on screen |
| Queue Display | Display only the Receipt number that generate from Queue Manager |
| Digital Clock Format | Set the system time either in 24H format or AM/PM format |
| Counter Name | Set the name for the Queue manager |
| Update Frequency | Define how frequent will the queue manager update the receipt list. |
| Surveillance Tab | |
| Camera 1 & 2 | Set the camera that will be used in POS system |
| Auto On Camera | Check this to enable the camera when login to POS |
| Keep Data for | Specify the duration to store the camera data |
| Stream Online | Check this will enable the system to synchronize the camera to online POS for every certain period. |
Please click on image to view clearer.


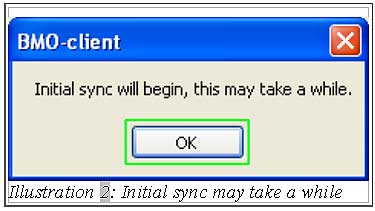
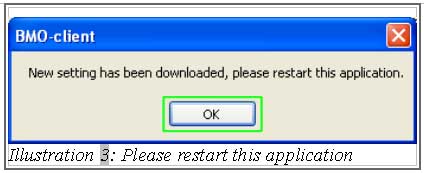
2. An “Initial Sync” pop up will be prompted and syncing will begin. Click “OK”. After a while, another pop up will be prompted to request you to restart the offline POS terminal application to apply the changes on new downloaded settings.
Please click on image to view clearer.
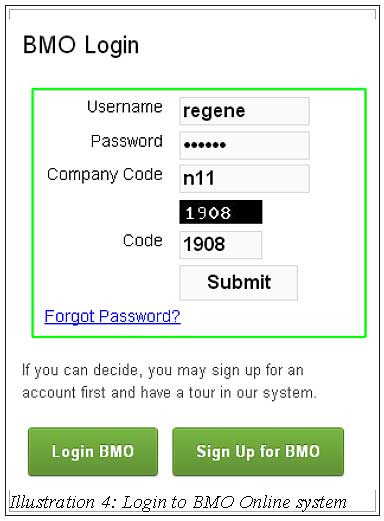
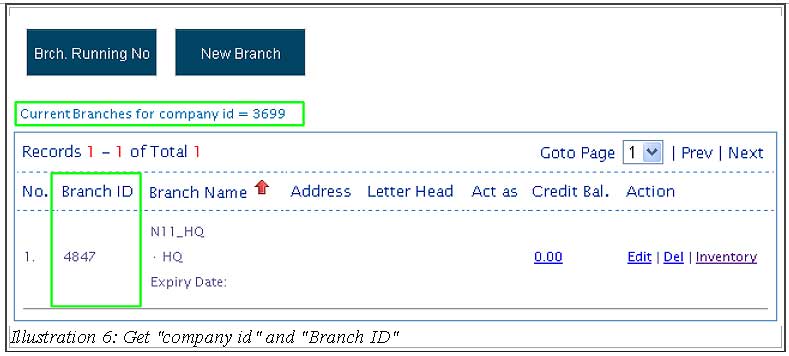
3. Login to your own BMO account to retrieve your “Company ID” and “Branch ID” .
Please click on image to view clearer.
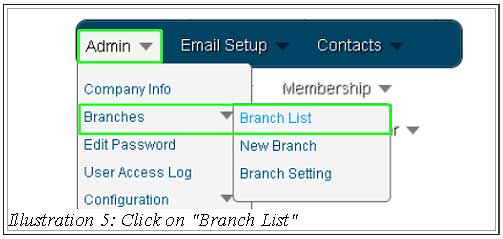
4. Go to Admin > Branches and click on “Branch List”.
Please click on image to view clearer.
5. Your branch ID will be clearly listed under the Branch ID column as illustrated below.
Please click on image to view clearer.
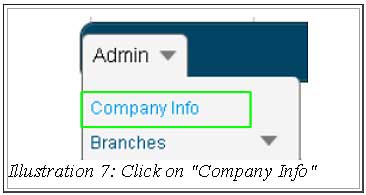
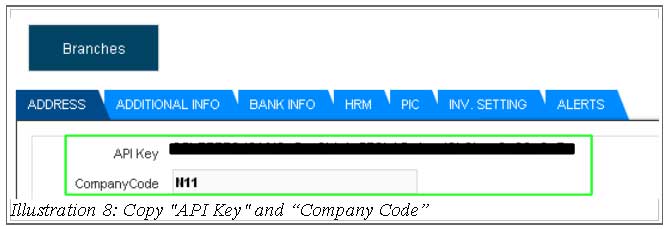
6. To get API key and company code, go to Admin > Company Info.
Please click on image to view clearer.
7. Copy and paste the API key into the “API Key” field.
Please click on image to view clearer.
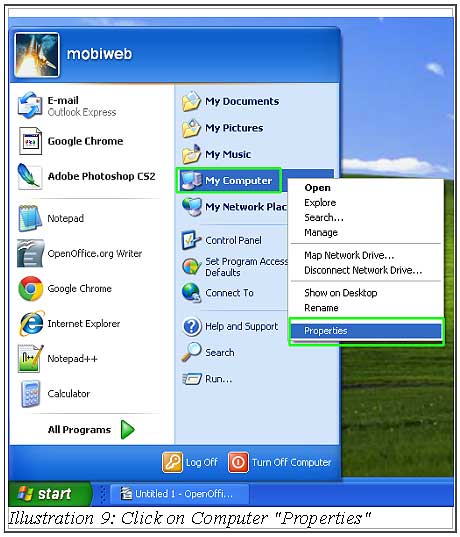
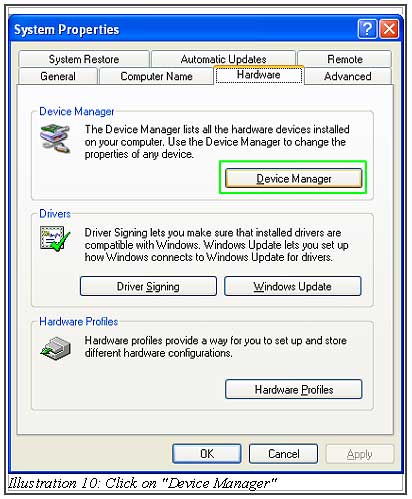
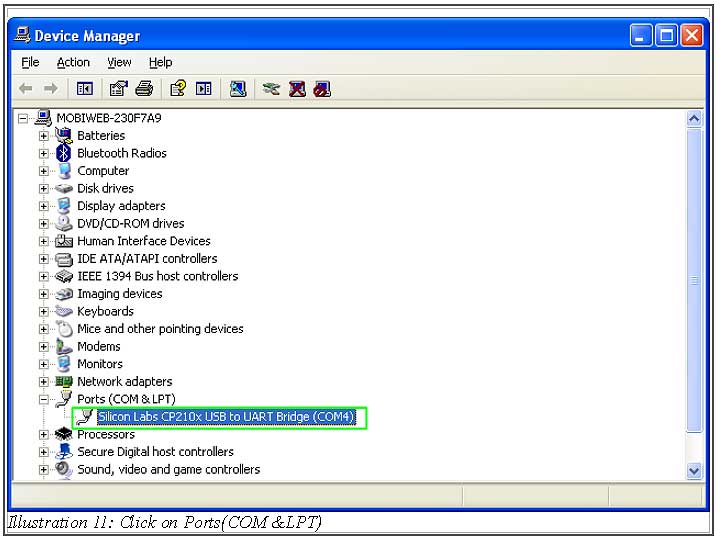
8. To find POS Terminal Stand display’s port number, please follow steps as shown in Illustration 9, 10 and 11.
Please click on image to view clearer.