Adding items into Simple POS System involves very simple steps. It can be done by just running your online POS System and Offline POS Terminal.
Below is a tutorial on how to add new item and set the item price.
A. How to create a new item individually
B. How to set price item
C. How to import item list
A. How to create a new item individually
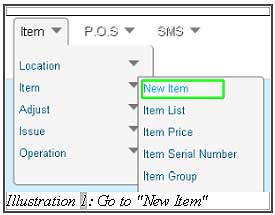
1. Every company can create new item using BMO POS system. The items can be categorised by using different categories. To create a new item, click on “Item > Item > New Item”.
Please click on image to view clearer.
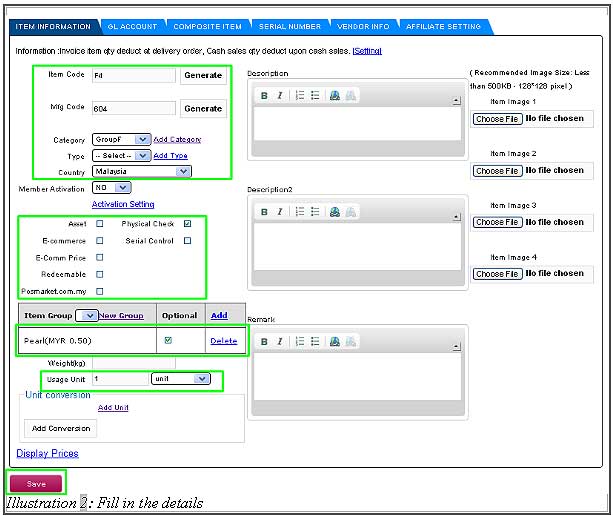
2. Fill in the details of the new item. Each Item Code must be unique. It can be named in either word or numbers. You can click on “Generate” button to automatically create the new item code and Mfg Code via the system. You also can create new category and new unit of item by clicking on the “Add Category” and “Add Unit” accordingly.
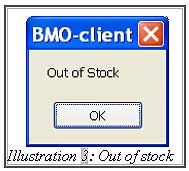
3. “Physical check” is used to check the quantity of the item for every transaction occurs. If the quantity is less than 0, the item will be ceased from selling. A notification as shown in Illustration 3, will pop up in offline POS Terminal to notify you that the item is out of stock. So, if you do not tick the “Physical check”, you can still buy the item although the item is already out of stock. However, user cannot check or uncheck the selection of “Physical check” once the transaction has occurred.
4. “Serial control” is used in voucher or PIN for top up purpose. If the item has a serial control, BMO POS system will require you to enter the serial number when receiving the item. When selling the item, serial number needs to be entered as well. The serial number list can be found from the menu or item list.
IMPORTANT:
Once there is a transaction occured, you cannot edit or modify the item code but you are allowed to edit other details, e.g. category and type.
Please click on image to view clearer.
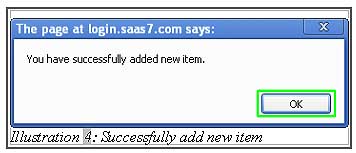
5. A pop-up notification will be prompted to tell user that a new item has been created successfully.
Please click on image to view clearer.
B. How to set Price Item
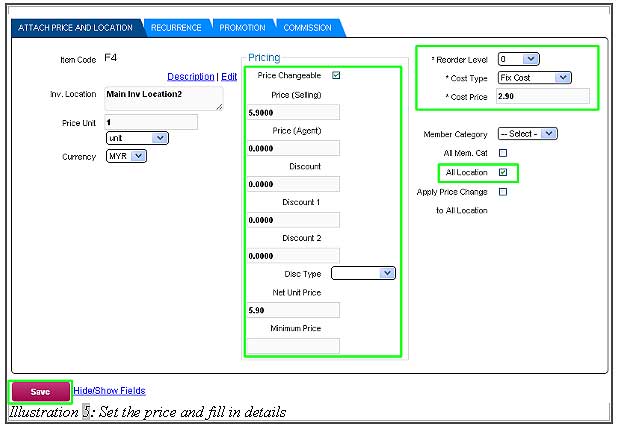
1. After the new item has been added successfully, BMO will automatically display an item price location page to setup a price for the item. The price is set as 0.00 and you can edit it as well. After filling the price details of the item. Click on “Save” button to save the price.
| Setting | Description |
|---|---|
| Item Code | Item code for item |
| Inv Location | Inventory location where the price apply, for same price, we select multiple inventory location |
| Price Unit | The price for base unit |
| Currency | Multiple currency supported |
| Price Changeable | Tick mean can change the price after this |
| Price (Selling) | Selling price |
| Price (Agent) | If the price agent filled, then commission calculation are based on price agent. |
| Discount Discount 1 Discount 2 | Discount for the Price Selling. It will calculate by system automatically. |
| Disc Type | Percentage is discount in percentage Amount is discount in amount |
| Net Unit Price | Price after Discount, Discount 1 and Discount 2 |
| Minimun Price | The minimum price for the item |
| Sales Agent Comm | Tick for agent commission |
| Reorder Level | If the item quantity hit the level, reorder alert appears at the dashboard. Please see Reorder-Alert section below. |
| Fixed cost | When user define selling price at the item price location attachment form, a fix cost can be entered at the same time. If it is average cost, the cost field is left empty. |
| Average cost | Average cost is calculated by dividing total cost with total quantity received. Both price shows at “item on hand” page and 'sales report” page |
| Cost Price | Use for fixed cost |
| Payment Type | Annually, HalPayment Alert byf-Yearly, Monthly, One-Time Payment, Quarterly |
| Payment Alert by | Date Pay, Date Schedule |
| Membership category | The price belong to this category of member. The member category can be define at membership category page, and when adding new contact, we can define the membership category for the contact. |
| All Location | All location share the same price, this eliminate the need to setup price for each location if the location use the same price. |
| All Mem. Cat. | All membership category share the same price. This only apply to member category. |
| Apply price change to all | This help eliminate redundant job. |
| Effective From | Date start of promotion price |
| Effective To | Date end of promotion price |
| Parent Price | Original Price. Enable only if that item has 2 different price |
Please click on image to view clearer.
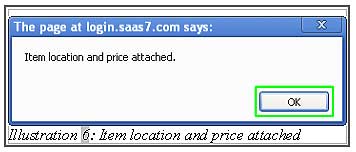
2. A pop-up notification will inform you that the item location and price has been set successfully.
Please click on image to view clearer.
C. How to import item list
We can import a list of item which is in CSV format so that it can save you a lot of time and increase the efficiency. CSV file is a comma separated values where we can easily convert from Microsoft Excel file. Please import a file that follows the file format of the “Sample.CSV”. When importing items, BMO online POS system will automatically create Unit, Category, Item Sales GL Code and Inventory location if the information is not available in your current BMO account.
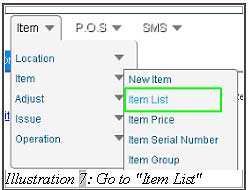
1. To import list of item, click on “Item List” (Item > Item > Item List).
Please click on image to view clearer.
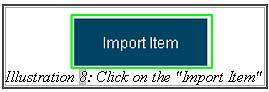
2. Then, click on “Import item” button.
Please click on image to view clearer.
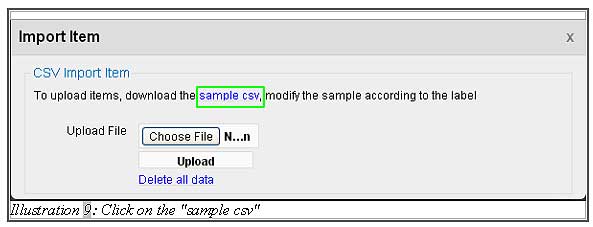
3. A screen as shown below will pop up. For the first time user, please download “Sample.CSV” as a reference. Click on “Sample.CSV”.
Please click on image to view clearer.

4. If you would like to open “Sample.CSV”, please set the character set as “Unicode(UTF-8)”. Then, click “OK”.
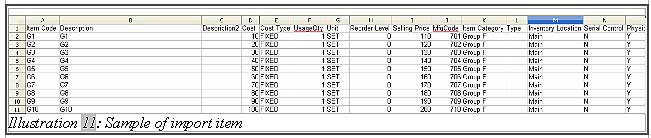
5. You can directly edit the content of the “Sample.CSV” and replace it with your own item list file.
Reminder: The item list must start from the second row. You must follow the format of the “Sample.CSV”.
Reminder: “Physical Check” is used to check the quantity of the item for every transaction occurs. In this CSV file, user can set either “Y”(which means yes) or “N” (which means no).
Reminder: “Quantity” means the receive quantity or on-hand quantity. In this CSV file, you can directly receive the quantity by entering the number of quantity.
Please click on image to view clearer.
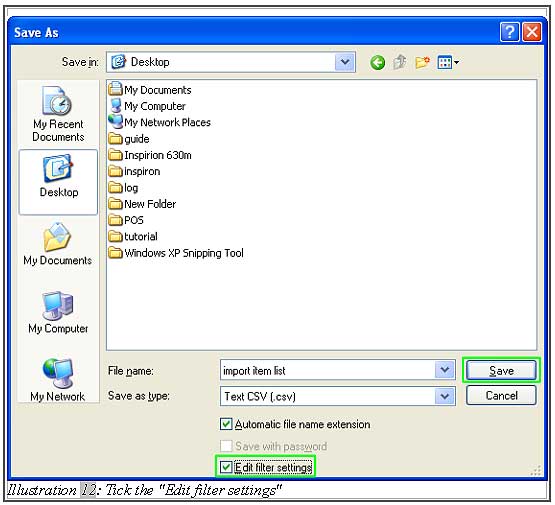
6. After you have done saving the file as .CSV format, you must tick the “Edit filter setting” before saving the file. Then, click “Save”.
Please click on image to view clearer.
7. Then, set the “Character set” as Unicode (UTF-8) and click “OK”.
Please click on image to view clearer.

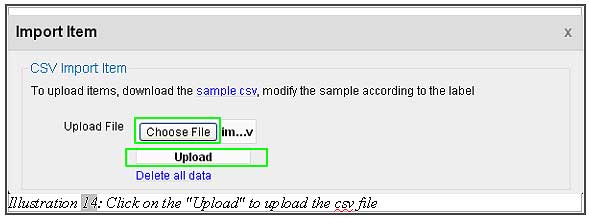
8. Next, you can now upload the file. Click on “Choose File” button to select file, then click “Upload” to upload it.
Please click on image to view clearer.
9. A pop up notification will inform you that you have added items successfully.
Please click on image to view clearer.

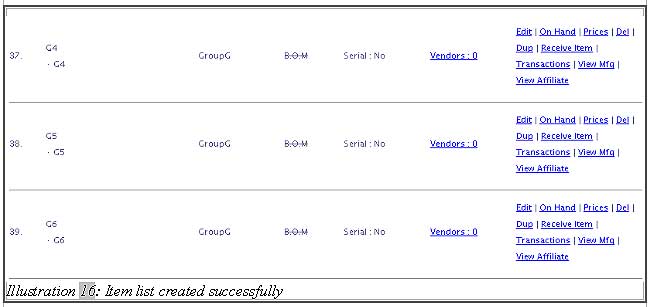
10. Finally, go to “Item List” (Item > Item > Item List). The items will be imported and added successfully if you import the correct format of the .CSV file.
Please click on image to view clearer.